Launch Countdown Clock
System Modules
T-Minus
An ESP32-powered launch countdown controller that transforms a consumer wall clock into an autonomous mission control display, complete with ambient lighting that shifts as liftoff approaches.
Overview
T-Minus is a hardware project that turns a 36-inch digital wall clock into a self-updating rocket launch countdown display. An ESP32 hidden inside the clock fetches upcoming launch data from public APIs, programs the countdown via infrared commands, and drives NeoPixel strips that wash the wall in colors corresponding to time-to-launch. The result is a piece of functional decor that provides ambient awareness of humanity's expanding presence in space.
The project emerged from a simple desire: I wanted a nice countdown clock for my home office. Commercial options either required manual programming, lacked ambient lighting, or didn't exist at this scale. So I built one.
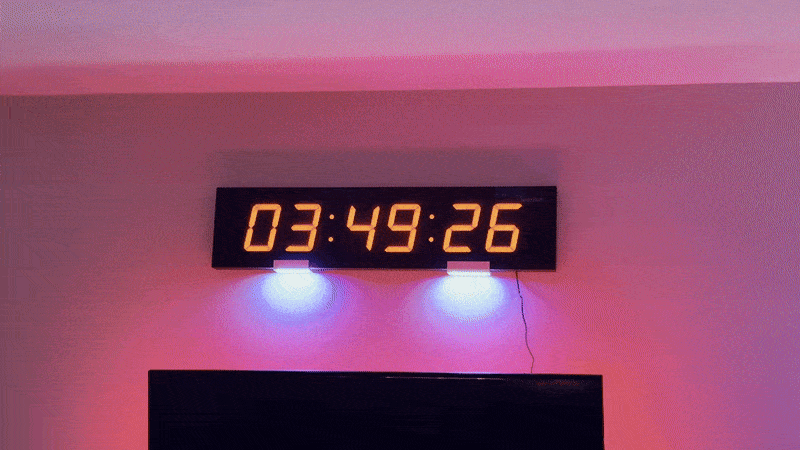
 The final installation: the 36-inch clock mounted on the wall with no visible wiring.
Technical Architecture
Hardware Foundation
The display is an Ivation 36-inch digital wall clock with 5.25-inch LED digits—large enough to read from across the room and visually reminiscent of mission control displays. Beneath the clock housing, two NeoPixel LED strips face downward, creating a smooth wall-wash effect rather than visible point sources.
Inside, an ESP32 microcontroller handles all intelligence: WiFi connectivity, API requests, NTP time synchronization, IR transmission, and LED animation. The original clock's remote control functionality becomes the interface through which the ESP32 puppets the display.
 The ESP32 board connected to the clock for bench testing
The IR Puppet Master
My initial approach was to reverse-engineer the communication protocol between the clock's onboard MCU and its display driver—intercept the signals, understand the protocol, and inject my own commands. After considerable time with a logic analyzer, I couldn't nail down the specifications reliably.
 Close-up of the clock's original microcontroller, which I initially investigated for direct protocol injection.
The pivot was realizing I didn't need to speak the display's native language. I just needed to speak "remote control."
By connecting the ESP32 to an IR LED pointed at the clock's receiver, I recorded the NEC-protocol signals for every button on the original remote. The resulting library lets the microcontroller simulate any button press: mode switches, number entry (0-9), start, stop, brightness adjustments. To set a countdown, the system navigates to timer mode, types in the HH:MM:SS duration digit by digit, confirms the entry, and starts the clock.
The trickiest part was reliability. Consumer IR remotes assume a human is watching and will retry if something doesn't work. An autonomous system needs determinism. I implemented a reset sequence that brings the clock into a known state before any programming operation—ensuring the display is in the expected mode before the ESP32 starts "typing."
 The automated sequence: resetting to a known state followed by digit-by-digit programming of the T-0 time.
Live Launch Integration
The ESP32 connects to fdo.rocketlaunch.live to fetch upcoming launches, parsing JSON responses to extract mission name, launch provider, vehicle, and—critically—the NET (No Earlier Than) timestamp. NTP synchronization keeps the internal clock accurate, and simple arithmetic determines how many seconds until T-0.
When a launch completes (or scrubs), the system automatically fetches the next one. On boot, it does the same. The clock is fully autonomous once powered.
T-Minus LED Visualizer
The NeoPixel strips provide ambient context without requiring you to read the digits. The color palette shifts based on proximity to liftoff:
| Time to Launch | Mode | Description |
|---|---|---|
| > 60 minutes | Deep Space | Calm blue with subtle twinkling stars |
| 30–60 minutes | Breathing | Smooth purple pulse, slowly intensifying |
| 1–30 minutes | Rhythmic Fill | Orange heartbeat effect that progressively fills the strip |
| < 60 seconds | Intense Pulse | Rapid red flashing and strobes |
| T-0 | Exhaust Plume | 10-second gold/red flickering animation |
The effects are specifically tuned for wall-wash aesthetics. Direct LED viewing produces harsh color transitions; bouncing light off a wall requires careful color blending to avoid muddy intermediate tones.
Web Control Interface
The ESP32 hosts a local web server accessible from any device on the same network. The dashboard provides:
- System status: Current countdown target, mission name, time to launch
- Manual fetch: Trigger an immediate API refresh
- LED control: Override automatic modes, adjust brightness
- Timer control: Manual start/stop and time entry for testing
 The ESP32 and IR transmitter system powered on and ready for integration.
Living With It
The clock now sits above my office TV, and I've found it changes my relationship with the launch industry in subtle ways. I notice when we're in a busy period—sometimes the countdown rarely exceeds T-5 hours between missions. I'm looking forward to watching cadence continue to increase over the coming year.
It's also become a natural prompt to actually watch launches. When the wall starts glowing red, I know it's time to pull up a livestream.
 The clock glowing with a deep blue 'Deep Space' mode during night testing.
Results
T-Minus demonstrates that interesting hardware projects don't require building everything from scratch. A $60 consumer clock, an ESP32, some LED strips, and creative use of IR protocols produced something that would cost significantly more commercially—if it existed at all.
The project combines live API integration, precise timing, hardware automation via unconventional interfaces, and ambient visualization into a single cohesive artifact that earns its place on the wall.